How to Install a Hardwood Tub Surround
When using hardwoods for the tub surround and decking, your alternatives for the decking material include either tongue-and-groove planks or flooring strips. Hardwood bath surround panels are custom-milled in most situations. Other solutions include off-the-shelf hardwood paneling, pre-milled doors or the plank flooring used in the deck.
Choosing the Species
Not all North American hardwood species react alike in humid conditions. The following species are favored for bathroom applications because they are especially moisture-stable, strong, hard, durable, and shock-resistant:
• Oak
• Maple
• Cherry
• Ash
• Walnut
• Hickory
Hardwood products that are prefinished specifically for bathroom applications are recommended. Their shop-quality finishes are both attractive and highly moisture-resistant. While these products may have a higher initial cost, they are less demanding in terms of worker skill level and work-site preparation. Most bathroom cabinetry is installed pre-finished because of the intricacies involved in cabinet making. Pre-finished hardwood flooring, mouldings, doors and paneling can be purchased off-the-shelf or, for larger budgets, custom-milled and finished to your specifications.
Build the Frame
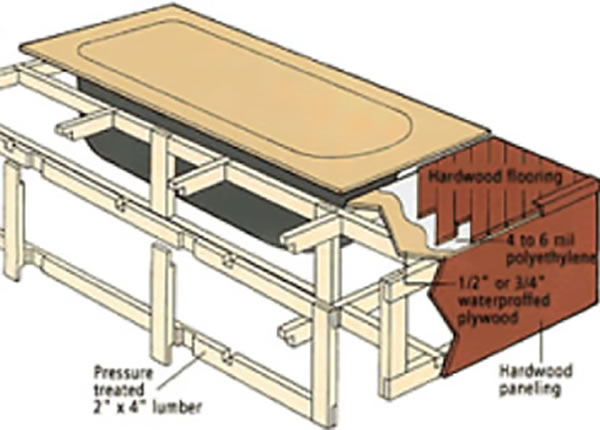
After the plumbing has been roughed in, measure the tub area and build a box frame using pressure-treated, 2″ x 4″ lumber and rabbet joints (see diagram). Be sure to leave an access point for any future repairs. Surface the frame by nailing 1/2″ or 3/4″ waterproofed plywood to the top of the box frame, then cut the hole for your tub. Finish all framing with a weatherizer and be sure to use galvanized nails.
Mount the Surround
Mount the hardwood surround material selected in Build the Frame to the box frame, again using galvanized nails. Side panels should be applied in the same manner, using a corner moulding to hide both the joint as well as expansion and contraction gaps. Be sure all sides of the surround are sealed before mounting it to the box frame. Remember to ensure the back side of the paneling is sealed because this will be the last time you have access to it.

Install the Deck
For a hardwood deck lay a vapor barrier of 4 to 6 mil polyethylene film over the plywood surface, then fasten the pre-finished hardwood plank flooring or tongue-and-groove flooring strips with flooring nails at 8-inch, off-centered intervals. Once again, be sure the backside of each strip is sealed before installation.
Finish the Wood
If you are finishing on site, fill any nail holes or blemishes with a commercial filler, then smooth the deck and paneling with 150-180 grit sandpaper. Wipe down with a clean cloth dipped in mineral spirits to temporarily highlight any sanding marks. Smooth out flaws, then remove sanding residue with a tack cloth, compressed air or brush. Apply the stain, let it dry and apply one of the recommended finishes of moisture-cure urethane, acid-curing Swedish finish or lacquer. When the first coat is dry, sand, stain and coat again. Repeat this cycle three times to achieve a brilliant, moisture-resistant finish.
Insert the Tub
Prepare the tub for insertion and connect all plumbing fixtures. Use industrial caulking to seal the tub to the deck surface, making sure that any potential leakage point is properly sealed.
Technical assistance and/or photos provided by: Allegheny Millwork & Lumber Co., Pittsburgh, Pa; Kohler Co., Kohler, Wis.; The National Kitchen & Bath Association, Hackettstown, N.J.; Plain & Fancy Custom Cabinetry, Schaefferstown, Pa.; and Sunrise Specialty Co., Emeryville, Calif.

