How to Build a Recessed Wall Unit
Design and Space Planning
The recessed, wall-anchored unit encompasses almost all of the variables you’ll need to consider in any built-in project — from space planning to materials selection to load-bearing capability.
To begin, measure the complete work area, including wall, floor and ceiling dimensions. Note the location of obstructions such as window frames, electrical outlets and/or studs. Determine whether all working corners are true right angles (square), and whether the floor is level, the walls are straight, and the ceiling is flat. You can measure most rooms with a rule, but if the angles are irregular, it’s best to assure true vertical and horizontal measurements with the aid of a 4′ level and a carpenter’s square. Use these to note any differences greater than 1/4″ and compensate accordingly in the space planning. If the area is relatively “true,” you can use secure shims to compensate for untrue angles that are less than 1/4″ off-center.

Wall Frame
Deal with defects in the surrounding wall, floor and ceiling by building the unit 1″ to 2″ smaller than the opening and trim it out with moulding after installation.
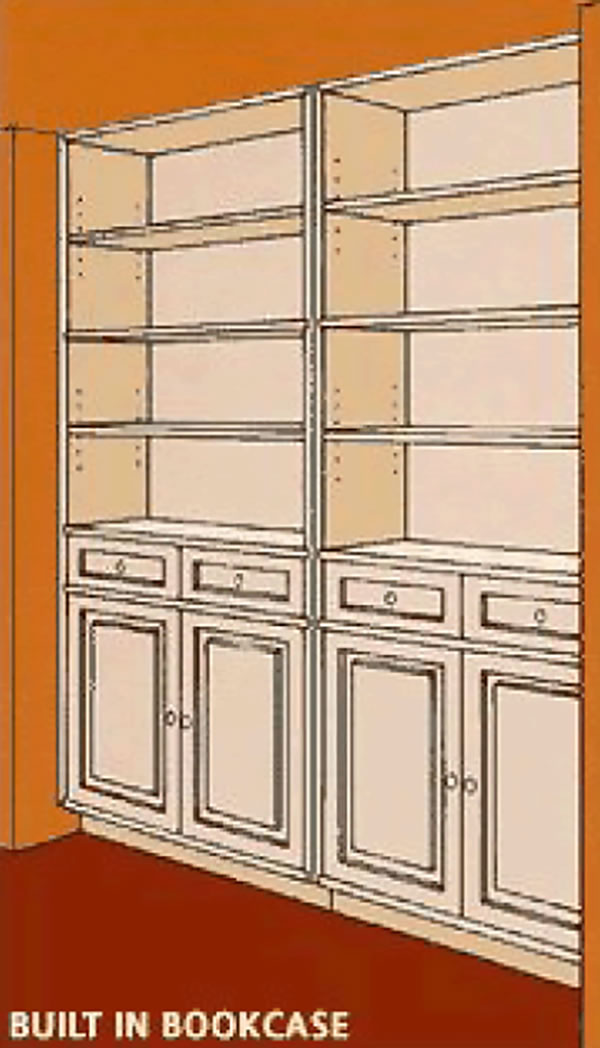
Next, sketch out a design, including the location of shelving and other items, such as cabinet doors, based on the measurements of the space. The bookcase featured in this example is designed for an alcove that measures 18″ deep, 6′ wide and 8′ high. Please refer to the bookcase illustration.
Shelf Span and Design
Proper shelving is vital for storage as well as the unit’s overall stability. As a rule of thumb, shelves should not span more than 42″, nor should they be any deeper than 18″. The most common shelf widths are 30″ to 36″, and average depths are 8″ to 12″.
To eliminate the potential for sagging shelves, try to design the bookcase to have spans of about 36″ between supports, using standard 3/4″ thick shelving. In this example, a support in the middle of the bookcase permits shelves to measure just under 35″ wide.
The first item to consider when specifying a North American hardwood for the job is how the built-in will be used. A bookcase, for example, must be able to accommodate both heavy reference books (a complete Encyclopedia Britannica set weighs 133 pounds) and lightweight paperbacks. Therefore, looks as well as load-bearing capacity must be taken into account. Please refer to the Shelf Deflection Table below.
Shelf Deflection of 1/4″ by Estimated Total Distributed Load in Pounds
This table shows loads that cause various 3/4″ unfixed 8″- and 12″-wide boards to sag 1/4″ when spanning 30″, 36″ and 42″. Loads required to cause sagging less than 1/4″ may be estimated by direct proportion. For example, the load required to cause a 1/8″ sag is one-half that of the values in the table.
| Material | Span | 30″ | 36″ | 42″ | ||||
|---|---|---|---|---|---|---|---|---|
| Width | 8″ | 12″ | 8″ | 12″ | 8″ | 12″ | ||
| Red Oak | 356 | 534 | 209 | 313 | 133 | 206 | ||
| Med. Density Fiberboard | 100 | 150 | 58 | 87 | 36 | 54 | ||
| Birch faced plywood, veneer core | 145 | 218 | 86 | 129 | 54 | 81 | ||
| Birch faced plywood, particleboard or med. density | 125 | 188 | 72 | 109 | 46 | 68 | ||
| Particleboard of med. density covered two sides and one edge with nominal 0.050″ high pressure decorative laminate | 234 | 350 | 137 | 205 | 86 | 129 | ||
| Information provided by the Department of Wood Science, Division of Forestry, at West Virginia University for the Architectural Woodwork Institute. | ||||||||
Build the Frame
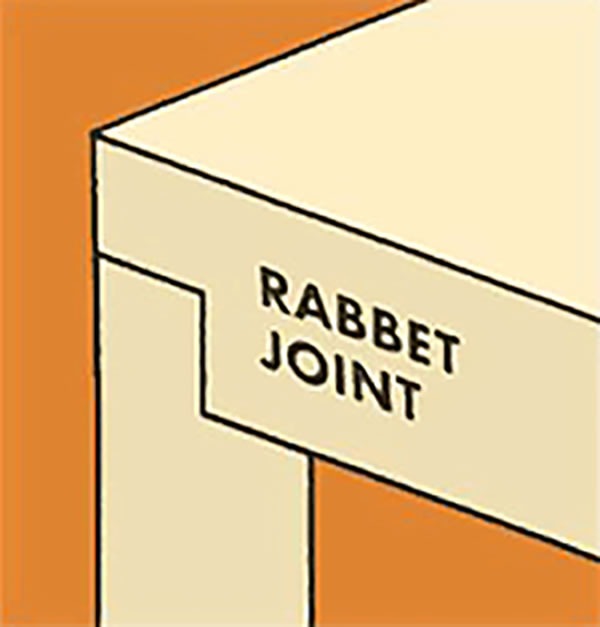
The bookcase featured in this example is 12″ deep and sits 6″ into the recess. The frame and shelving are Custom 3/4″ oak, with a 1/4″ oak plywood backing to add strength. Construct the bookcase frame with dado and rabbet joints, created by fitting one piece of wood into the routed recess of another piece. A dado joint is in the middle of a board, and a rabbet joint is at the end of a board.
Make your recesses no deeper than half the size of the working material. For example, you’ll want to rout a 3/8″ recess in the 3/4″ oak sidewalls displayed in this project. Be careful not to make the recesses too deep because this can weaken the board. Create rabbet joints for the top and bottom of the frame, and dado joints for the cabinet top and the permanent shelf. Also, create a 1/4″ recess for the backing to attach on to the rear of the frame.

For the top and bottom of the built-in frame, use wood glue to help hold the joints together, and also enter crossing screws, down from the top and in from the sides. For this project, use #5 or #6 screws that are 1 1/2″ long, or twice the thickness of the wood. Avoid nailing the joints together because the nails can work loose with the wood’s movement. Once the “box” of the frame is constructed, attach the 1/4″ oak backing into its recess. Fasten it with glue and screws every 6″. This will “rack,” or pull the frame together as you work on the remainder of the project.
This built-in unit is the combination of a cabinetry system and shelving. The entire built-in will actually rest on top of a toe kick that supports the total weight of the unit. A toe kick is a 3 1/2″ inset that allows the user to stand closer to the shelves. This frame is constructed of oak 1″ x 4″s, with perpendicular boards every 12″ to disperse weight bearing and add strength. Assemble it like a box frame, and make sure it’s level because it will affect the balance of the rest of the project. Place the frame onto the toe kick and fasten it with glue and screws.

The cabinetry system is next, and is built directly into the frame. It allows for four 6″ high drawers, with two sets of 28″ high cabinets beneath the drawers. As a rule, limit cabinet doors to a maximum width of 24″, for structural purposes. These cabinet doors are each about 17″ wide. You can make your own doors and drawers, or have them custom-made. Also, your choice of door hinges and drawer slides will depend on how you use the storage space, and will affect how you hang the doors and drawers. Select the doors, drawers and appropriate hardware in the planning stages to ensure necessary clearances.
Adding Shelf Strength
You can increase a shelf’s strength by attaching a 1″ x 2″ hardwood apron to the front edge. Similarly, applying an apron to the back of the shelf creates the same effect, while not interfering with design. These aprons make the shelf almost 400 percent stronger. You can create an even stronger apron by dadoing the back of the apron to cover the shelf’s front edge.
Installing the Shelving
Once the cabinetry is in place, you’re left with about 56″ for shelf space. Install the permanent shelf near the midway point (around 68″), where you previously routed dado joints on each side of the built-in frame. Bookcases more than 8′ tall should have permanent shelving every 3′. Glue the shelf into place, and secure it with diagonally entered screws from the bottom.
While the fixed shelf provides structural integrity, additional adjustable shelves provide long-term storage flexibility. Normally, shelves sit 12″ to 15″ apart, but this can vary depending on how they will be used. Consider the items that will sit on the shelves and add 2″ for fingers to reach the top of each. The permanent, middle shelf here allows for about 28″ of free space, or about one adjustable shelf, on each side. Supporting hardware for adjustable shelves is relatively inexpensive and easy to install. You can use common shelf standards, or the more attractive shelf pins. Select the standards or pins that meet your project’s budget, decorative and/or load-bearing demands.
Shelf pins typically have 1/4″ diameter shanks that fit into holes of the same diameter. The holes are vertically spaced about 1″ to 2 1/2″ apart, and positioned starting at 10″ up from the bottom and 10″ down from the top of the frame. In this case, create 8″ of shelf pin holes both above and below the permanent shelf. Allow the shelves to overhang the pins by 2″ in the front and back. Your local lumber company sells drill templates that help ensure accurate shelf-pin holes. Pre-drill holes before finishing the hardwood, and be careful not to drill through the sidewall.
Completing the Job
Finish the Woodwork
Once you’ve drilled holes for the shelf pins or standards, the project is ready for on-site finishing. The key to a good finish is repeated sanding and multiple finish coats.
Anchor to the Wall
Allow the finished hardwood to dry completely before installing the bookcase, and use specified hardware to mount the frame into the wall. Brick and stone walls require masonry anchors, while studded walls require screws. Use a 3″ to 4″ long, #6, darkened or antique brass screw. Mount the unit into the wall with two vertical rows, between 3′ and 4′ apart (horizontally), securing the anchors directly into the studs or stone every 18″ (vertically).
Technical assistance and/or photos provided by: The Architectural Woodwork Institute, Potomac Falls, Va.; Merillat Industries, Inc., Adrian, Mich.; and, Dan Kelly Diversified Woodworks, Mogadore, Ohio.

